
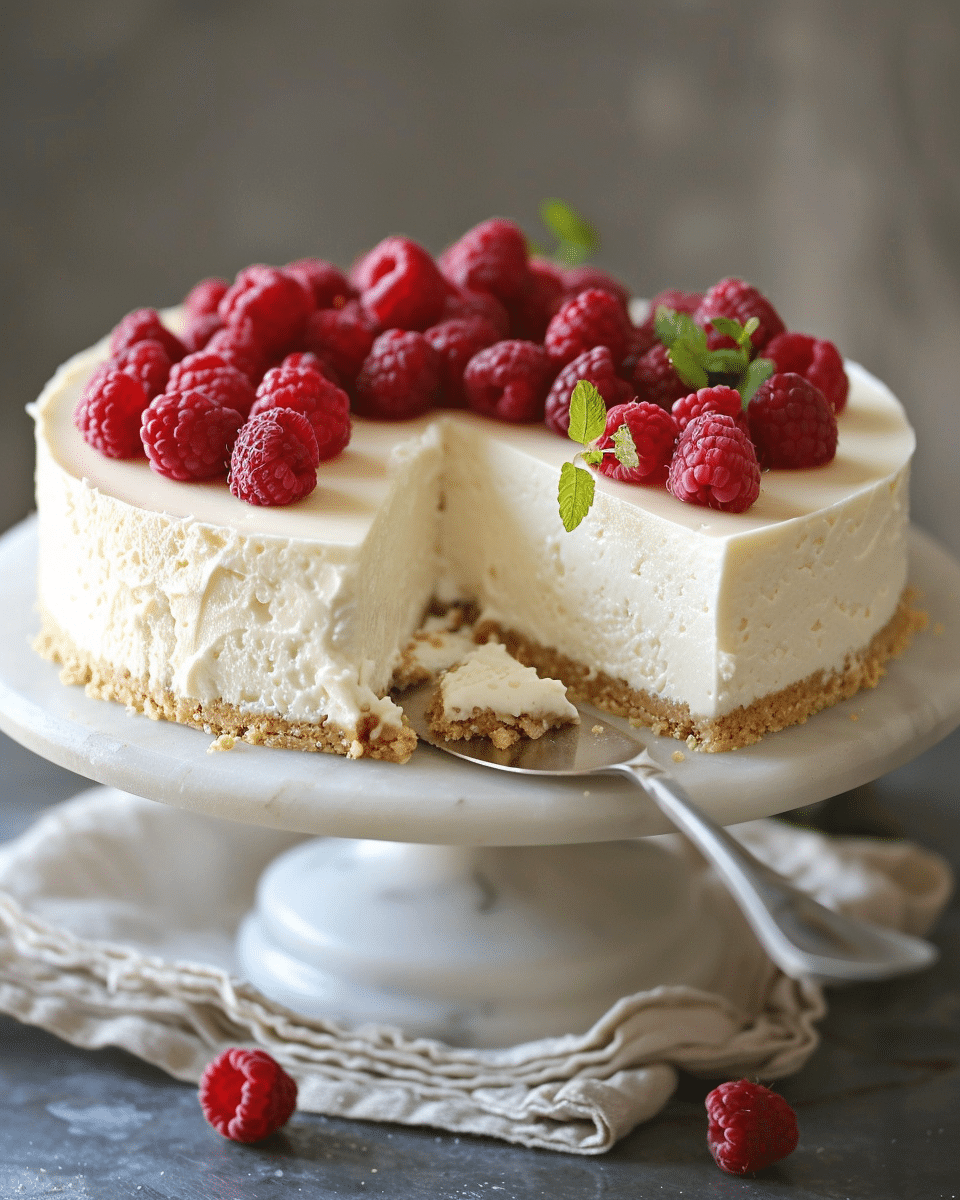
This classic no-bake cheesecake is a creamy, rich dessert with a buttery graham cracker crust and a silky smooth filling. I love making it when I’m craving something sweet and indulgent but don’t want to turn on the oven. It’s perfect for warm days, special occasions, or whenever I want a stress-free dessert that always impresses.
Why You’ll Love This Recipe
I find this cheesecake incredibly simple to make, yet it delivers such elegant results. There’s no need for baking or water baths, and the texture turns out light, airy, and rich all at once. I can prep it in just 20 minutes, and then the fridge does the rest of the work. It’s also easy to customize with toppings like berries or whipped cream, depending on what I have on hand. Whether I’m serving guests or treating myself, this recipe always hits the mark.
Ingredients
(Tip: You’ll find the full list of ingredients and measurements in the recipe card below.)
For the Crust:
1 1/2 cups graham cracker crumbs
1/3 cup granulated sugar
1/2 cup (115g) unsalted butter, melted
For the Cheesecake Filling:
1 cup (240ml) heavy whipping cream, chilled
16 oz (450g) cream cheese, softened
3/4 cup (90g) powdered sugar
2 teaspoons vanilla extract
1 tablespoon fresh lemon juice (optional, for added flavor)
For Topping (Optional):
Fresh berries or berry compote
Whipped cream
Directions
I start by mixing the graham cracker crumbs and granulated sugar in a medium bowl. Then I stir in the melted butter until everything is evenly moistened.
I press this mixture firmly into the bottom of a 9-inch springform pan and place it in the fridge to chill while I prepare the filling.
In a large bowl, I whip the chilled heavy cream until stiff peaks form, then I set it aside.
In another bowl, I beat the softened cream cheese until it’s completely smooth and creamy.
I mix in the powdered sugar, vanilla extract, and lemon juice (if using) until everything is well combined.
Using a spatula, I gently fold the whipped cream into the cream cheese mixture. I’m careful not to deflate the mixture.
I pour the filling over the chilled crust and smooth the top with a spatula.
I refrigerate the cheesecake for at least 6 hours or overnight until it’s firm and set.
Just before serving, I add fresh berries, berry compote, or whipped cream if I feel like dressing it up.
Servings and timing
This recipe makes 10 slices.
Prep Time: 20 minutes
Setting Time: 6 hours
Total Time: 6 hours 20 minutes
Calories: Approximately 350 kcal per slice
Variations
I like switching things up by using chocolate cookie crumbs for the crust instead of graham crackers. Sometimes I mix a bit of melted white chocolate into the filling for extra richness. For a citrus twist, I add more lemon juice and a bit of zest. If I want a tropical flavor, I top it with mango or pineapple. The base is super versatile, so it adapts to whatever flavors I’m in the mood for.
Storage/Reheating
I store leftover cheesecake in the refrigerator, covered with plastic wrap or in an airtight container, for up to 5 days. It stays fresh and creamy the whole time. For longer storage, I freeze individual slices wrapped tightly and then place them in a freezer-safe container. When I’m ready to enjoy a slice, I just thaw it in the fridge overnight. Since this is a no-bake dessert, there’s no need for reheating.
Related Recipes:
FAQs
How do I know when the cheesecake is set?
I check that the cheesecake is firm around the edges and slightly jiggly in the center. After at least 6 hours in the fridge, it should hold its shape when sliced.
Can I make this ahead of time?
Yes, I often make it the night before so it has plenty of time to chill and set. It actually tastes even better the next day.
What can I use instead of graham crackers?
If I don’t have graham crackers, I use digestive biscuits, vanilla wafers, or even crushed pretzels for a salty twist.
Can I use whipped topping instead of heavy cream?
Yes, I can substitute whipped topping (like Cool Whip) in equal amounts. It gives a slightly different texture but still works well.
Why is my filling runny?
If my filling turns out runny, it’s usually because the cream wasn’t whipped to stiff peaks or the cream cheese was too soft. I always make sure to chill the cream and whip it well before folding it in.
Conclusion
This classic no-bake cheesecake is one of my favorite go-to desserts when I want something easy, elegant, and crowd-pleasing. The creamy filling and buttery crust come together with minimal effort and no baking required. Whether I’m entertaining or just treating myself, I know I can rely on this recipe to deliver a perfect slice every time.
📖 Recipe:
Print
Classic No-Bake Cheesecake
5 Stars 4 Stars 3 Stars 2 Stars 1 Star
No reviews
- Author: Isabella
- Total Time: 6 hours 20 minutes
- Yield: 10 slices
- Diet: Vegetarian
Description
This classic no-bake cheesecake is a rich, creamy dessert with a buttery graham cracker crust and a silky smooth filling. Perfect for warm days or special occasions, it’s easy to make and requires no baking.
Ingredients
1 1/2 cups graham cracker crumbs
1/3 cup granulated sugar
1/2 cup (115g) unsalted butter, melted
1 cup (240ml) heavy whipping cream, chilled
16 oz (450g) cream cheese, softened
3/4 cup (90g) powdered sugar
2 teaspoons vanilla extract
1 tablespoon fresh lemon juice (optional)
Fresh berries or berry compote (optional)
Whipped cream (optional)
Instructions
- In a medium bowl, mix graham cracker crumbs and granulated sugar.
- Stir in melted butter until evenly moistened.
- Press mixture firmly into the bottom of a 9-inch springform pan and chill in the fridge.
- In a large bowl, whip chilled heavy cream until stiff peaks form. Set aside.
- In another bowl, beat softened cream cheese until smooth and creamy.
- Add powdered sugar, vanilla extract, and lemon juice (if using) to cream cheese and mix until combined.
- Gently fold whipped cream into the cream cheese mixture using a spatula.
- Pour filling over chilled crust and smooth the top.
- Refrigerate for at least 6 hours or overnight until firm and set.
- Before serving, top with fresh berries, compote, or whipped cream if desired.
Notes
Chill the whipped cream and whip to stiff peaks for best texture.
Customize with different crusts like chocolate cookies or pretzels.
Store in the fridge for up to 5 days or freeze individual slices for longer storage.
For a citrusy twist, add more lemon juice and zest.
Ensure cream cheese is soft before mixing for a smoother filling.
- Prep Time: 20 minutes
- Cook Time: 0 minutes
- Category: Dessert
- Method: No-Bake
- Cuisine: American
Nutrition
- Serving Size: 1 slice
- Calories: 350
- Sugar: 20g
- Sodium: 220mg
- Fat: 25g
- Saturated Fat: 15g
- Unsaturated Fat: 8g
- Trans Fat: 0g
- Carbohydrates: 26g
- Fiber: 0g
- Protein: 4g
- Cholesterol: 70mg


